Onboarding of syndicated applications
A syndicated application is an application that is directly managed by the software vendor, and not hosted on the Cloudesire cloud services.
This feature enables software vendors to sell applications that are already hosted somewhere and that has native support for multi-tenancy. The provisioning of a new tenant should be almost instantaneous, and the integration has to be done directly via Cloudesire API.
This documentation is a must for a vendor looking to integrate with the cloudesire platform.
Please start by reading the event notification section to have an overview of the platform notifications.
Are you using Java/Spring boot in your tech stack? We do and we released a template for new project implementing the syndication api
Prime approach to the provisioning workflow
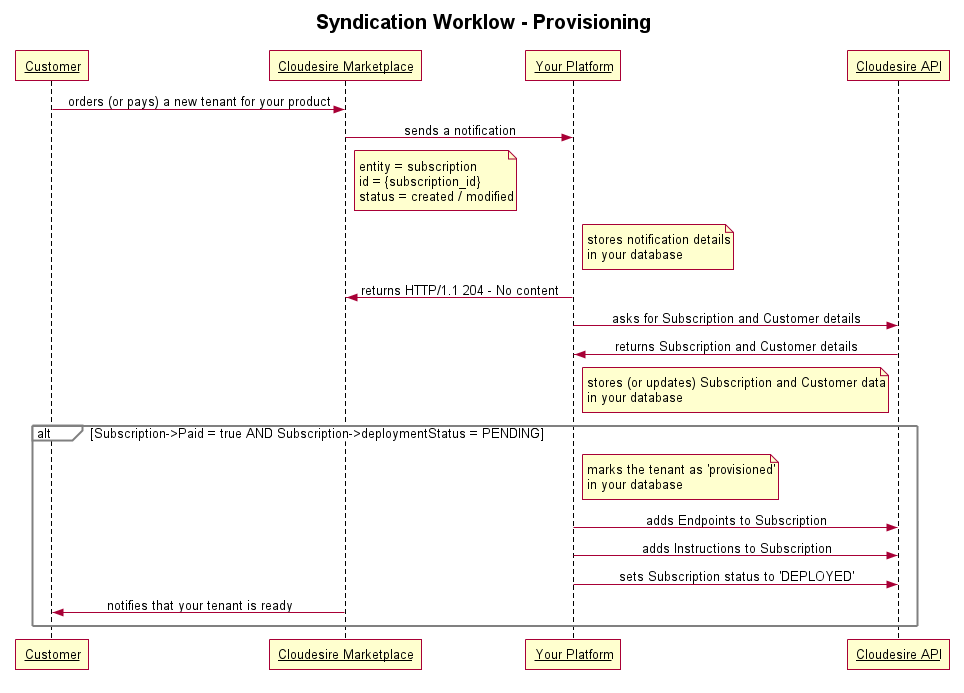
A simple example follows, explaining the workflow of a new tenant order and provisioning:
- a customer make an order for one of your products
- the platform sends a notification to your endpoint, containing a
Subscription CREATEDevent - once you've received this notification, you need to call platform API in order
to retrieve the subscription details (given its identifier) which includes the
customer data (name, email, etc.) that you need, and
paidfield, which can betrueif the customer already paid the subscription for your product orfalseif the customer hasn't paid yet the subscription - if the
paidfield istrueyou can provision your tenant in your platform - if the
paidfield isfalseyou need to wait for the next notification which will contain aSubscription MODIFIED. Once you've received this notification, you need to call our API again, retrieve the subscription data, and check if thepaidfield istrue. - once you've executed the provisioning of the tenant in your platform, you need
to call our API for the last time, setting the subscription
deploymentStatusstatus toDEPLOYED - when the subscription status changes to
DEPLOYED, the platform notifies the customer, providing him the instructions to access your application - when the subscription is renewed (by the customer or by autorenew), the platform
sends a notification
Subscription MODIFIED. - when the subscription expires, the platform sends a notification
Subscription DELETED, then you need to unprovision the tenant.
How to setup the syndication endpoint
Test your source code in our staging marketplace where fake payments are possible and where you can test the whole customer journey, end-to-end.
Let's start: after having created a Syndicated Product in your catalog (see application onboarding), configure the HTTP/HTTPS URL of your Syndication Endpoint where the platform events will be delivered.
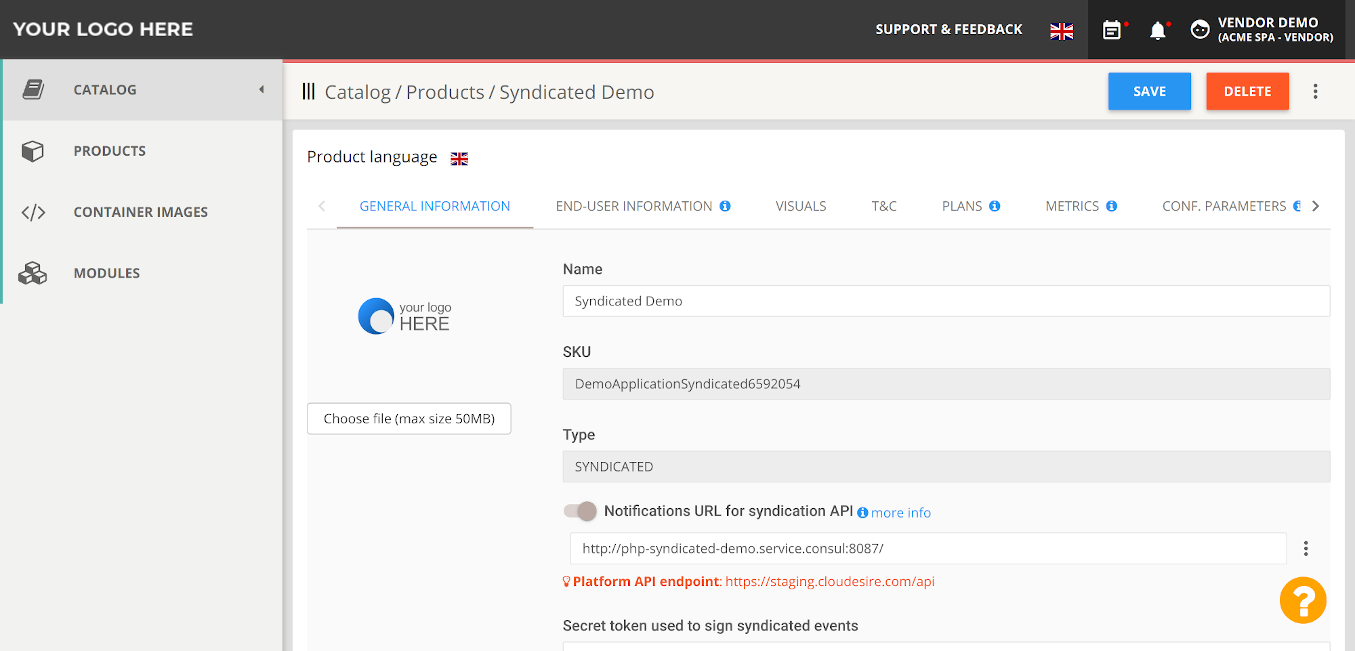
To increase the security of your endpoint, please read the security section.
The "Test Events" feature
If you are at the first step of developing an integration, you may find useful the "Test Events" functionality, available in the hamburger menu into Product editing page.
This button will send a test notification to your endpoint, without kicking any kind of workflow on the Cloudesire side. This test notification contains some stubbed data that you can configure within the interface.
We recommend to use this feature immediately after having configured your endpoint for the first time, to be sure that is correctly reachable from Cloudesire platform.
Workflow of a Subscription
First order creation
With your test customer account you created on the staging-marketplace, submit an order for your product (buy or try, depending on your plan configuration).
The first event you will receive, is a Subscription CREATED event.
Retrieve the subscription resource after a Subscription CREATED
Please make sure that you understand the basics of the Cloudesire API before interacting with the platform: most endpoints require authentication.
You can start by fetching the Subscription resource, that should exist after
having received a Subscription CREATED event, by using the address contained
in the entityUrl attribute:
GET /api/subscription/2388 HTTP/1.1
An example response would be:
HTTP/1.1 200 OK
Content-Type: application/json

{
    "billingPeriod": 1,
    "buyer": {
        "url": "user/2240"
    },
    "company": {
        "url": "company/433"
    },
    "createdAt": "2015-01-05T13:59:00Z",
    "deploymentStatus": "WAITING_FOR_PAYMENT",
    "id": 2388,
    "invoices": [
        {
            "url": "invoice/2390"
        }
    ],
    "lastInvoice": "2015-01-05T13:59:00Z",
    "name": "Application syndicated - Base version",
    "nextInvoice": "2015-02-05T13:59:00Z",
    "orders": [
        {
            "url": "order/2389"
        }
    ],
    "paid": false,
    "product": {
        "url": "product/126"
    },
    "self": "subscription/2388",
    "syndicatedEndpoints": [],
    "type": "NORMAL",
    "updatedAt": "2015-01-05T13:59:00Z"
}
The type attribute contains which kind of order the customer has issued, and
can be:
NORMAL: standard order for which the customer is going to pay an invoice before using the application;TRIAL: a request for a free trial of the application;
For NORMAL subscriptions, you may notice that the deploymentStatus attribute
may be WAITING_PAYMENT, meaning that the customer has not paid the first invoice
yet, or PENDING, meaning that the platform is waiting for your provisioning
process to complete.
This status is reflected also on the paid field, that can be true or false.
The paid field is true when all the generated invoices for a certain
subscription has been paid by the customer, otherwise it is false.
Before provisioning the tenant, the paid field should be true.
If not, you should wait for another Subscription MODIFIED event, checking that
the deploymentStatus attribute contains PENDING, and the paid field is
true.
For
TRIALsubscriptions, you should provision the new tenant immediately, and the initialdeploymentStatuswill bePENDING(and neverWAITING_PAYMENT).
As you can see, the Subscription resource contains references to other resources (e.g. Orders, Invoice, User, Product). You may want to fetch those object to retrieve additional information beside the data contained in the Subscription resource.
For example the next step may be to fetch the associated resource user/2240,
to retrieve information about the user who requested your application.
Retrieve customer information
Once we got the customer reference, you can fetch it to obtain information about the customer:
GET /api/user/2240 HTTP/1.1


HTTP/1.1 200 OK
Content-Type: application/json

{
    "acceptedTerms": true,
    "activated": true,
    "activationDate": "2014-01-01T00:00:00Z",
    "address": {
    "address": "Via Napoli",
    "city": "Pisa",
    "country": "IT",
    "id": 2241,
    "zipCode": "12345"
    },
    "creationDate": "2014-07-02T08:20:01Z",
    "email": "customer@example.org",
    "enabled": true,
    "environment": "cloudesire",
    "id": 2240,
    "name": "Demo Customer",
    "phoneNumber": "123891237912",
    "self": "user/2240",
    "userName": "customer",
    "userRole": "ROLE_USER"
}
At this point you may have everything you need to create a new tenant in your platform, but feel free to explore all the related resources.
Update subscription information (after a new tenant provisioning)
Once the tenant provisioning is complete, you just need to notify the platform that the customer may use the application, activating the subscription and entering information on how to reach the application. This means that you need to provide endpoints and end-user instructions.
Providing endpoints (end-user links to access application)
Send a POST request to subscription/2388/endpoints to set the end-user application endpoints:
POST /api/subscription/2388/endpoints HTTP/1.1
Content-Type: application/json; charset=utf-8

[
    {
    "endpoint": "https://application.example.org/login",
    "description": "Login page",
    "category": "APP"
    },
    {
    "endpoint": "https://application.example.org/reset_password",
    "description": "Password reset",
    "category": "PASSWORD_RESET"
    },
    {
    "endpoint": "https://docs.example.org/",
    "description": "Online Documentation",
    "category": "DOCUMENTATION"
    },
    {
    "endpoint": "https://www.youtube.com/embed/dQw4w9WgXcQ",
    "description": "Video tutorial",
    "category": "VIDEO"
    },
]
Possible values for the category field are: APP, PASSWORD_RESET,
DOCUMENTATION, VIDEO. Please note that an endpoint with the category APP
is required, while the others are optional.
Applications endpoints must be accessible via HTTPS.
Providing End User Instructions
Vendors can submit localized messages to customers, for example to provide a welcome text.
Languages depend on the marketplace, for example in a marketplace with English and Italian languages available:
POST /api/subscription/2388/instructions HTTP/1.1
Content-Type: application/json; charset=utf-8

{
    "en": "Welcome to your new application instance! Start by...",
    "it": "Benvenuto nella tua nuova applicazione! Per iniziare..."
}
Providing application credentials
You can add credentials for the first access to the application, that will be shown to the customer after the provisioning is complete.
Credentials have a unique key, a value and a localized description. They
are weighted so they can be returned to the customer in a specified order.
A special key CredentialsFile can be used to render the value in a
pre-formatted text area.
Credential values are not returned (they are nulled) to the vendor after
creation.
POST /api/subscription/2388/credentials HTTP/1.1
Content-Type: application/json; charset=utf-8

[
  {
    "key": "username",
    "value": "user@ma.il",
    "description": {
      "en": "Login",
      "it": "Nome utente"
    },
    "weight": 1
  },
  {
    "key": "password",
    "value": "jei9je9y",
    "description": {
      "en": "Password",
      "it": "Parola chiave"
    },
    "weight": 2
  }
]
Consider using auto-login to improve the customer experience.
Set provisioning status to DEPLOYED
As the final step, send a PATCH request on the subscription/2388 endpoint to
alter the subscription status:
PATCH /api/subscription/2388 HTTP/1.1
Content-Type: application/json; charset=utf-8

{
    "deploymentStatus": "DEPLOYED"
}
Starting from now, the customer can use your application!
If something could go wrong during the provisioning of a new tenant in your application, discover a strategy to handle exceptions.
Subscription naming
You can customize the initial name of a subscription that customers will find on their dashboard with:
PATCH /api/subscription/2388 HTTP/1.1

{
    "action": "SET_NAME",
    "name": "Nickname of this subscription"
}
Note that if a customer names their subscription, the customer name takes precedence.
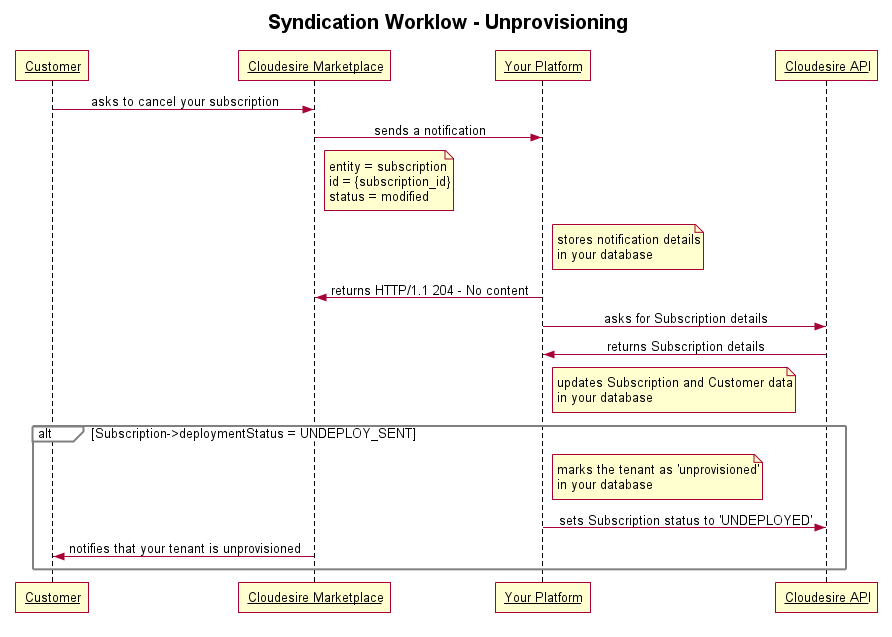
Update subscription information (when the subscription expires)
When the subscription period expires, or a Terminate action is requested by
an user, the platform will send another Subscription MODIFIED event. Fetch
again the Subscription and look at the deploymentStatus attribute that is
set to UNDEPLOY_SENT for the current subscription.
In this moment you must unprovision every resource allocated during the
provision step (e.g.: disable access to your application), and confirm the
operation via a PATCH request on the subscription/2388 endpoint to finally
mark the subscription as successfully terminated:
PATCH /api/subscription/2388 HTTP/1.1
Content-Type: application/json; charset=utf-8

{
    "deploymentStatus": "UNDEPLOYED"
}
Now you will receive a new Subscription DELETED event as a confirmation of the
termination process.
You have now completed the standard workflow for a syndicated application, congratulations!
Billing events notifications
When the customer asks for a subscription renewal, version upgrade or
trial-to-paid upgrade which result in a new invoice, the platform will send a
Subscription MODIFIED event.
In case of a deferred upgrade, the event will be sent at the start of the new billing period.
After receiving the event, you have to fetch the Subscription resource, and make sure that your subscription status is aligned with ours.
For example:
- for renewals: check the updated
subscription.endDatefield, and the last order insubscription.orderswill haveorder.orderTypewith a value ofRENEWAL - for product plan upgrades: check the updated
subscription.productVersionfield, and the last order insubscription.orderswill haveorder.orderTypewith a value ofSYNDICATED_UPGRADE - for trial-to-paid upgrade: check both updated
endDateandsubscription.typewith valueNORMALinstead ofTRIAL
Managing Provisioning Exceptions
If something goes wrong during the provisioning of a new tenant in your
application, please be sure to set the subscription status to FAILED by
invoking our API, for example:
PATCH /api/subscription/{id} HTTP/1.1
Content-Type: application/json; charset=utf-8

{
    "deploymentStatus": "FAILED"
}
and then to provide the customer appropriate end-user instructions, in order to explain what happened (e.g. sorry, email address is already in use)
Advanced Billing Features
There a few features that can be used alongside the basic integration.
Configuration Parameters
If you specified some configuration parameters for your application, then you can retrieve the values entered by the end-customer by invoking the Subscription's API.
GET /api/subscription/{id} HTTP/1.1

HTTP/1.1 200 OK
Content-Type: application/json

{
    ...
    "configurationParameters": {
        "configurationParameter/123": "custom_value"
    },
    ...
}
Application Metrics
Even for syndicated applications, you can define and bill application metrics.
Besides the general usage and information provided, you should only take care of an additional HTTP header, sent to your metric endpoint: CD-Subscription-Id.
An example request:
GET /custom_metric_endpoint HTTP/1.1
Content-Type: application/json; charset=utf-8
CD-Subscription-Id: 28
An expected response from your metric endpoint:
HTTP/1.1 200 OK
Content-Type: application/json; charset=utf-8

{
    "value": 3.0
}
This HTTP header will let you to identify the subscription from which a metric is requested, so you can return the proper value.
It is also possible to define custom headers which will be sent with the request.
When Try before Buy is offered to customers, make sure to reset metric values when customers pay for the first time otherwise they will be billed for trial resources too.
Plan Upgrade on behalf of a customer
You can even upsell to your customers a new subscription plan.
PATCH /api/subscription/{id} HTTP/1.1
Content-Type: application/json; charset=utf-8

{
    "action": "SYNDICATED_UPGRADE",
    "productVersion": {
        "url": "productVersion/123"
    }
}
The subscription should be an active subscription of one of your customers, and the configuration should be the new product version you want to upgrade to.
The response of this operation contains an upgrade field which can have three
values:
DEFERRED
The upgrade order has been deferred to the next billing period, no events or invoices are generated and the subscription is not modified. At the end of the billing period, the subscription gets renewed to the new product version.
{
    "upgrade": "DEFERRED",
    "order": "order/123"
}
FREE
The upgrade order was free of charge, no invoice is generated.
{
    "upgrade": "FREE"
}
PAID
The customer will receive a new invoice, that needs to be payed, with prices scaled depending on how many days are remaining for the current billing period of the existing subscription.
Once requested, you will receive a Subscription MODIFIED event since the configuration attribute in the subscription resource will be modified accordingly to your request.
{
    "upgrade": "PAID",
    "invoice": "invoice/123"
}
Trial to paid subscription upgrade
It's possible to upgrade a trial subscription to a paid one. The subscription
must be in DEPLOYED state and cannot have a lifespan set.
You can upgrade a trial subscription by renewing it for the desired number of months.
Once renewed, a trial subscription becomes a proper paid subscription.
Given a trial subscription you are a vendor for with ID {id}, you can order a
renewal for e.g. 1 month with a PATCH request:
PATCH /subscription/{id} HTTP/1.1
Accept: application/json
Content-Type: application/json

{
    "action": "renew"
}


HTTP/1.1 204 No Content
Custom billing
As a vendor, you can generate a custom invoice for an active subscription. The invoice will be issued immediately.
When the amount is positive an instant one-off upsell order will be created, otherwise a one-off discount order is created.
Given a subscription you are a vendor for with ID {id} you can generate a
custom invoice with a POST /subscription/{id}/invoice request:
POST /subscription/{id}/invoice HTTP/1.1
Accept: application/json
Content-Type: application/json

[
    {
        "description": "First row",
        "identifier": "first",
        "price": {
            "price": "100.0000",
            "currency": "EUR"
        },
        "quantity": 2.0,
        "unit": "un"
    },
    {
        "description": "Second row",
        "identifier": "second",
        "price": {
            "price": "23.4567",
            "currency": "EUR"
        },
        "purchased": "2021-11-19T00:00:00Z",
        "quantity": 1.0,
        "unit": "un"
    }
]


HTTP/1.1 201 Created
Location: https://backend.cloudesire.com/api/invoice/10000
When the custom billing is used to
storicize live reports, the purchased
field marks the right limit of the storicization for that identifier.
When missing, the purchased field defaults to "now".
Currency conversion
The platform converts foreign currencies into EUR (via the
price.price.currency field) according to a fixed conversion table.
Currently accepted currencies:
USD (= 0.93 EUR)
Postponed one-off upsell
You can add postponed one-off upsell costs to a subscription.
Only the next invoice generated for a subscription with postponed one-off upsell costs will contain these lines.
Given a subscription you are a vendor for with ID {id} you can add one-shot
costs to it with a POST /subscription/{id}/invoice/oneshot request:
POST /subscription/{id}/invoice/oneshot HTTP/1.1
Accept: application/json
Content-Type: application/json

[
    {
        "description": "First row",
        "price": {
            "price": "100.0000"
        },
        "quantity": 2.0,
        "unit": "un"
    },
    {
        "description": "Second row",
        "price": {
            "price": "23.4567"
        },
        "quantity": 1.0,
        "unit": "un"
    }
]


HTTP/1.1 200 OK
{}
To remove one-shot costs from a subscription just post an empty list:
POST /subscription/{id}/invoice/oneshot HTTP/1.1

[]
Recurring upsells Costs
You can also add recurring upsells costs to a syndicated subscription.
Every invoice generated for a subscription with recurring upsells costs will contain these lines.
API is the same of the one-shot costs, with endpoint
POST /subscription/{id}/invoice/recurring.
Proceeds declaration
As a vendor you can declare proceeds for one of your products active subscriptions.
Given a subscription with ID {id}, you can generate a cashed invoice with:
POST /subscription/{id}/invoice?cashed=true HTTP/1.1
Accept: application/json
Content-Type: application/json

[
    {
        "description": "First row",
        "price": {
            "price": "100.0000",
            "vat": 22.0
        },
        "quantity": 2.0,
        "unit": "un"
    },
    {
        "description": "Second row",
        "price": {
            "price": "23.4567",
            "vat": 22.0
        },
        "quantity": 1.0,
        "unit": "un"
    }
]
These invoices will be used only while generating balance reports at the end of the month.
Recap before publishing
Before publishing your application into the marketplace, please make sure that these requirements are satisfied:
- appropriate translations are provided for the end-user-instructions, for each marketplace languages (e.g. English, Italian, etc.)
- no HTML links are present into the end-user instructions text (if you need to provide the end-users a link, please create a specific endpoint for it; e.g. "reset password")
- at least one application endpoint is provided
- all the endpoints must have an appropriate category
- all the endpoints must be accessible via HTTPS due to the nature of data that business applications contains
During a purchasing process, a crystal-clear communication is a crucial point. For this reason, please don't send email to the customer after the provisioning of his tenant in your application: Cloudesire will notify him for you.
If you need to provide the customer some information after the provisioning (e.g. the credentials to access your application, or a short guide to start using your application) you can provide specific end-user instructions.
Auto-Login
It is great to enable your customers to auto-login to your application without providing any credentials.
For instance, it means that your customers will not need to remember credentials for Cloudesire platform AND your product. Also, you will not need to provide end-user instructions to your customers to login for the first time to your application. Long story short, you can provide your customer a smooth and simple user experience.
To achieve this goal, we strongly suggest to add an authorization token to the endpoint to access the application. In this way, you can recognize customers and enable automatic log-in to your application.
If you follow this flow, you do not need to specify user credentials into end-user instructions.